Fajita Fiesta
We all love backyard barbecues. The instant our nose gets a hint of the grilled goodness thrown on to the grates, our senses takeover and we automatically make plans for our next BBQ bash. Hotdogs and hamburgers are classics, but it’s time we spice up the barbecue and host a fiesta… ¡a fajita fiesta! Fajitas offer a variety of combinations to make all guests’ taste buds pleasantly delighted, so it is best to prepare the food in a family-style-like manner. Today we are going to prepare a combination of chicken, shrimp, veggies, and steak—but feel free to mix and match your favorites!
What you will need:
Steak, Shrimp, Veggies, Chicken—or the protein of your choice!
Oil & seasoning—Roasted Garlic & Herb for the shrimp, chicken, and veggies, Steak Seasoning for the steak.
Skewers
Griddle
Tortillas
Any other toppings to enhance your fajita—guacamole, salsa, sour cream are all great options!
iGrill
Now let’s get started!
Steak & Veggies -- In order to prepare our fajitas so our toppings are ready at the same time, we are going to prep the steak and the veggies first. Let’s start with the veggies!
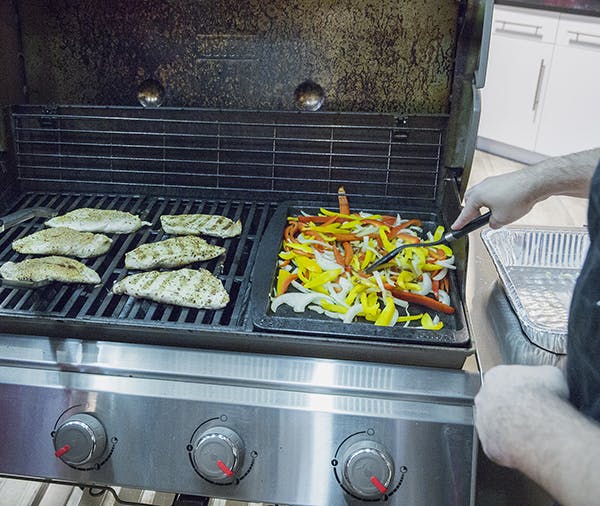
- Slice and generously oil and season the veggies with salt and pepper or our Roasted Garlic and Herb seasoning. The size of the slice is personal preference, but I prefer long and thin slices that are guaranteed to cover the entire tortilla. Preheat the griddle on high for 10-15 minutes. Once the grates and griddle are preheated, put the veggies on the griddle. Grill the veggies on high for a total of 8 minutes and stir every 3 min using a heat safe plastic spoon for a total of about 8 min.
- NY Strip steaks are a great choice for fajitas because of their fat:flavor ratio.
- First, oil the steak, season both side with salt and pepper, then place it on the grill over direct high heat at 450-500 degrees F. The steak should grill 3 min a side for a total of 6 min for medium-rare.
- A medium rare steak has an internal temp of 135 F. The temperature of the steak will rise 3-5 degrees once it is off the grill, so make sure you take the steak off around 130 F. Feel free to grill your steak to your preference! You can use our grilling guide as a reference to help you reach your goal temperature if you prefer to grill it longer! And don't forget to use your iGrill to make sure you get the temperature exactly where you want it!
- To create nice sear marks, lay the steak on the sear grate and use the new high plus setting on the Gen II LX model.
- Make sure you put the steak and the veggies on the grill at the same time!
.jpg?auto=compress,format)
Chicken
- Chicken can dry out and stick. Like your palm, chicken is thick at one end and skinny at the other. Before grilling we recommend leveling out the chicken using a meat mallet to make sure the chicken cooks evenly and stays as juicy as possible.
- Once even, oil the chicken on both sides to prevent the chicken from sticking to the grates and to help the seasoning stick. Once the chicken is lightly covered in oil, add the seasoning of your choice (I’m going to use roasted garlic and herb) and get ready to put the chicken on the grill!
- You will grill the chicken at 400 F for 4 minutes on each side. Take the chicken off once the internal temperature reaches 165 degrees. No sooner!

Shrimp
- The shrimp will go on the grill last because they take the shortest amount of time to prep! I would recommend placing the shrimp on a skewer to make it easier flip.
- Oil and season the shrimp before putting it on the grill otherwise it will stick.
- Put the shrimp on at 400 F. Keep the shrimp on for 1.5 min a side. You will notice a significant different in the color once the shrimp are ready to be served! We used pre-marinated shrimp.
Final Touches
- While the food is resting, put your flour/corn tortillas on grates for 30 seconds a side over medium heat. Feel free to add some cheese to the top side of the tortilla after you have flipped 1x!
Enjoy!
Now it is time to set up your build-your-own fajita station with your favorites and enjoy! Your guests will smell this array of deliciousness and know that dinner is ready! We know your friends and family may come to your backyard to enjoy each other’s company, but these steps to create your own fajita fiesta will guarantee people come for the conversation but stay as long as it takes for them to go home with the leftovers!
Who knows… fajita Friday might end up becoming your next backyard tradition!


