Smoking Pork Shoulders
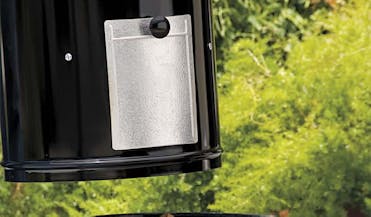
![Technique Course5D4 1](https://content-images.weber.com/legacy-technique-images/technique_course5d4/technique_course5d4_1.jpg?fit=crop&crop=focalpoint&w=371&h=217&auto=compress,format&fp-x=0.5&fp-y=0.5&fp-z=1)
Step 1:
A water smoker can maintain temperatures between 110° and 130°C for several hours, which is exactly what you need in order to break down the connective tissue in pork shoulders.
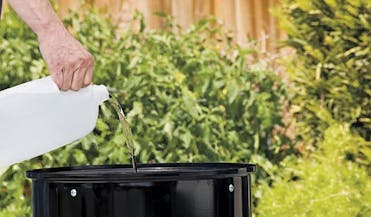
![Technique Course5D4 2](https://content-images.weber.com/legacy-technique-images/technique_course5d4/technique_course5d4_2.jpg?fit=crop&crop=focalpoint&w=371&h=217&auto=compress,format&fp-x=0.5&fp-y=0.5&fp-z=1)
Step 2:
Fill the water pan in the middle section of the smoker. It will absorb some of the heat from the charcoal and release it slowly along with some humidity.
![Technique Course5D4 3](https://content-images.weber.com/legacy-technique-images/technique_course5d4/technique_course5d4_3.jpg?fit=crop&crop=focalpoint&w=371&h=217&auto=compress,format&fp-x=0.5&fp-y=0.5&fp-z=1)
Step 3:
Smoke the shoulders over indirect very low heat, with the lid closed, adding a couple of wood chunks to the coals every hour for the first 3 hours. After 8 to 10 hours of roasting, the meat will be so tender that you will be able to slide the bone cleanly out of the shoulder (the internal temperature should be 92 to 95°C).
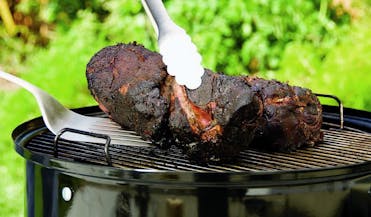
![Technique Course5D4 4](https://content-images.weber.com/legacy-technique-images/technique_course5d4/technique_course5d4_4.jpg?fit=crop&crop=focalpoint&w=371&h=217&auto=compress,format&fp-x=0.5&fp-y=0.5&fp-z=1)
Step 4:
Ideally you will need both a spatula and a pair of tongs to remove the shoulders from the smoker without the meat falling apart. Tightly cover the shoulders with aluminium foil and leave to rest for 30 minutes.
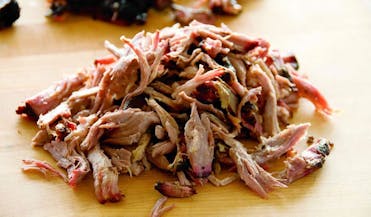
![Technique Course5D4 5](https://content-images.weber.com/legacy-technique-images/technique_course5d4/technique_course5d4_5.jpg?fit=crop&crop=focalpoint&w=371&h=217&auto=compress,format&fp-x=0.5&fp-y=0.5&fp-z=1)
Step 5:
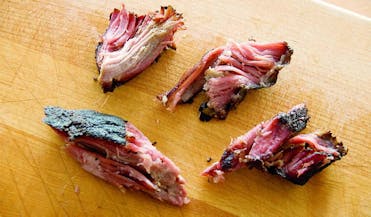
Shred the meat using your fingers or two forks. Discard any clumps of fat, but hold onto the crispy bits of ’bark’ that have developed on the outside of the meat.
![Technique Course5D4 6](https://content-images.weber.com/legacy-technique-images/technique_course5d4/technique_course5d4_6.jpg?fit=crop&crop=focalpoint&w=371&h=217&auto=compress,format&fp-x=0.5&fp-y=0.5&fp-z=1)
Step 6:
The pinkish colour of the meat is a good sign that smoke has penetrated the surface and filled the pork with authentic barbecue flavour.
Let's Gear up Recommended Tools
Related Skills
![Smoking Beer Can Chicken](https://content-images.weber.com/legacy-technique-images/technique_images/technique_course5d1.jpg?fit=crop&crop=focalpoint&w=400&h=250&auto=compress,format&fp-x=0.5&fp-y=0.5&fp-z=1)
Mastering Smoke
Smoking Beer Can Chicken![Smoking a Boneless Beef Rib Roast](https://content-images.weber.com/legacy-technique-images/technique_images/technique_course5d3.jpg?fit=crop&crop=focalpoint&w=400&h=250&auto=compress,format&fp-x=0.5&fp-y=0.5&fp-z=1)
Mastering Smoke
Smoking a Boneless Beef Rib Roast![Smoking Tuna in Cedar Paper](https://content-images.weber.com/legacy-technique-images/technique_images/technique_course5d6.jpg?fit=crop&crop=focalpoint&w=400&h=250&auto=compress,format&fp-x=0.5&fp-y=0.5&fp-z=1)