The Best Brine and Gravy For Your Next Turkey
Fall. I absolutely love this time of year. The crinkling of the colorful leaves, the fall colors, football, and the thought that Thanksgiving is right around the corner, and you know what that means….turkey on the grill.
I first started grilling our turkey 6 years ago on our Weber Performer® and haven’t cooked a turkey inside ever since. Once you taste a turkey that’s been grilled, you’ll never heat up your kitchen again and cook one inside in the oven!
Now, there are many choices one has. You can add smoke flavor by adding flavored wood chips/chunks, you can brine or not brine, you can grill on charcoal or gas, and you can add as many different seasonings as you like. Your choices are endless.
My personal favorite is our recipe for Brined and Barbecue Turkey, found in our cookbook, “Weber’s Charcoal Grilling – The Art of Cooking with Live Fire”. You can check out the recipe here.
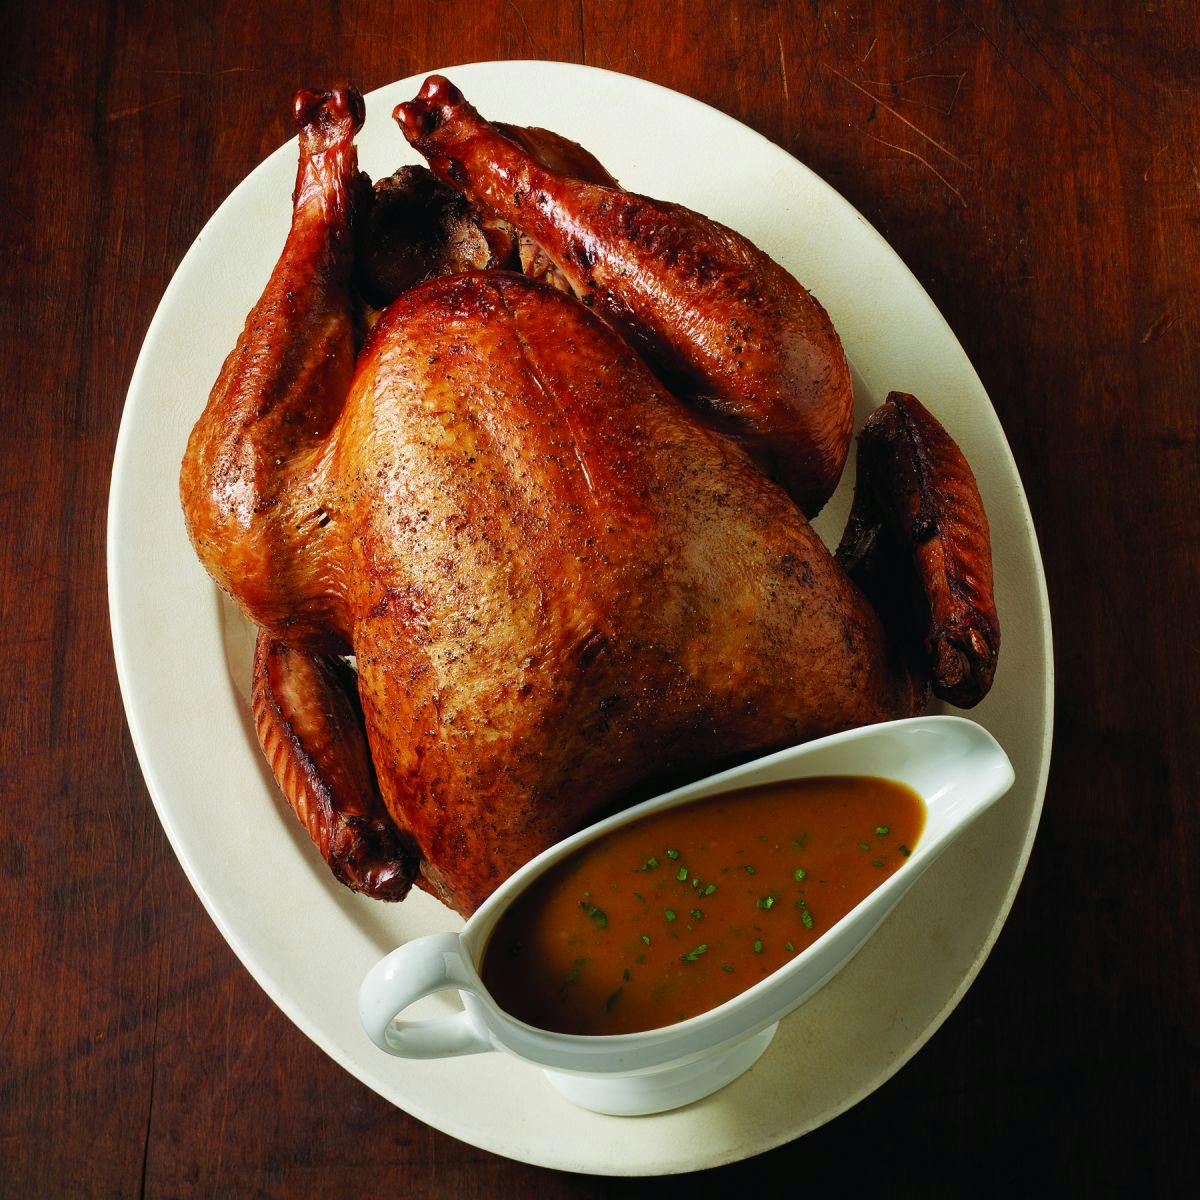
What makes this recipe work is the combined effort of brining in apple juice, and then adding apple wood chips while grilling to add beautiful smoke flavor to the bird which also helps add that wonderful color to the outside.
The turkey itself sits in a “bath” of chicken broth flavored with all kinds of goodies including carrots, celery, onions (you know…the holy trinity of cooking) and extremely aromatic herbs such as rosemary, thyme, and sage. OMG! Is your mouth watering yet?
Once off of the grill and fully rested, when it’s time for carving time, I promise you this may be the juiciest bird you have ever cut into. Between the brine and the broth, it is heaven on a plate.
And finally, the icing on this “turkey cake” is making a pan gravy that is made by using the drained broth from which the turkey sat in for several hours, pouring that thru a fat separator or strainer, and combining that with flour, butter, and some wine to make an incredibly flavorful and delicious gravy.
Can you smell it? Can you taste it? Are you ready?
If you haven’t done so already, you must try grilling your turkey this year. As I said, it’s easier than you think, you have so many options, and an endless variety of flavors to choose from. I wish you and your families a very heartfelt Happy Thanksgiving and Happy Turkey time!
Brined and Barbecued Turkey with Pan Gravy
by Jamie Purviance

Serves: 10 to 12
Prep time: 30 minutes
Brining time: 18 to 24 hours
Grilling time: 2 1/2 to 3 1/2 hours
Ingredients:
Brine
2 quarts apple juice
1 cup kosher salt
2 tablespoons dried rosemary
2 tablespoons dried thyme
1 tablespoon dried sage
1 teaspoon coarsely ground black pepper
1 turkey, 10 to 12 pounds, fresh or defrosted
½ cup melted unsalted butter, divided
1 teaspoon freshly ground black pepper
6 cups reduced-sodium chicken stock
1 large yellow onion, roughly chopped
2 large carrots, roughly chopped
2 celery stalks, roughly chopped
4 small chunks apple wood or 4 small handfuls apple wood chips, soaked in water for at least 30 minutes
Gravy
Reserved pan liquid plus enough chicken stock to make 4 cups of liquid
1/4 cup unsalted butter, cut into 4 equal pieces
1/4 cup all-purpose fl our
⅓ cup dry white wine
2 tablespoons finely chopped fresh Italian parsley
Kosher salt
Freshly ground black pepper
Instructions:
1. In a large pot combine the brine ingredients. Stir vigorously until the salt has dissolved.
2. Remove the neck and giblets from both ends of the turkey and reserve in the refrigerator for the gravy. Cut off and reserve the wing tips for the gravy, too. If your turkey has a trussing clamp, leave it in place. Do not truss the turkey. Rinse the turkey, inside and out, with cold water.
3. Partially fill a cooler with ice. Open a large, sturdy plastic bag in the cooler. Place the turkey, breast side down, in the bag. Carefully pour the brine over the turkey and then add 3 quarts of cold water. Press the air out of the bag, seal the bag tightly, close the lid of the cooler, and set aside for 18 to 24 hours.
4. Prepare a half circle or crescent-shaped fire for low heat. Remove the turkey from the bag and rinse it, inside and out, with cold water. Pat dry with paper towels. Discard the brine. Lightly coat the turkey with some of the melted butter. Season with the pepper.
5. Pour the chicken stock into a sturdy, 9 x 13-inch roasting pan. Add the onion, carrots, and celery. Add the reserved turkey neck, giblets, and wing tips. Place the turkey, breast side down, in the roasting pan.
6. Place the roasting pan in the center of the cooking grate. Position the pan so the turkey legs face the charcoal. Drain, then add 2 wood chunks or 2 handfuls of wood chips to the charcoal. Cook the turkey over indirect low heat (300˚F to 350˚F), with the lid closed, for 1 hour. Use your iGrill to monitor the turkey's temperature.
7. After 1 hour, to maintain the heat, add 10 to 12 unlit charcoal briquettes to the lit charcoal, using long-handled tongs to tuck the unlit charcoal between the lit charcoal. Drain and add the remaining wood chunks or chips to the charcoal. Carefully turn the turkey over in the pan so the breast faces up. Continue to cook the turkey over indirect low heat, with the lid closed, for a second hour.
8. At the end of the second hour, baste the turkey all over with the remaining butter. If any parts are getting too dark, tightly wrap them with aluminum foil. Once again, add 10 to 12 unlit charcoal briquettes to the lit charcoal to maintain the heat. Continue to cook the turkey over indirect low heat. The total cooking time will be 2 1/2 to 3 1/2 hours. The turkey is done when the internal temperature reaches 175°F in the thickest part of the thigh (not touching the bone) and 165°F in the breast. Note: The internal temperature will rise 5°F to 10°F during resting.
9. Transfer the turkey to a cutting board, loosely cover with foil, and let rest for 20 to 30 minutes before carving. Meanwhile, make the gravy.
10. Strain the pan liquid through a sieve into a large fat separator and discard all the solids. Add enough chicken stock to equal 4 cups of liquid. Place the roasting pan over a stovetop burner set to medium heat. Add the butter and flour. As the butter melts, stir with a wooden spoon and cook until the mixture turns the color of peanut butter, about 5 minutes, stirring frequently. Add 4 cups of the reserved pan liquid (but not the fat) plus the wine. Bring the gravy to a boil, whisking frequently to dissolve the lumps. Lower the heat and simmer the gravy for a few minutes or until it reaches the consistency you like. If the gravy gets too thick, add more chicken stock a little at a time and simmer until it reaches the right thickness. Turn off the heat. Add the parsley. Add salt and pepper to taste. Carve the turkey. Serve warm with the gravy.
© 2007 Weber-Stephen Products LLC. Recipe from Weber’s Charcoal Grilling™. Used with permission.


